這篇文章將教大家如何利用Github建立個人部落格 網站!部落格 ,可以閱讀本文參考建立部落格網站。
使用Visual Studio Code編輯時,這套件可以快速貼上當前時間:
Insert Date String,使用方法的快捷鍵:Shift+CTRL+I
⬇⬇⬇文章開始⬇⬇⬇
選擇編輯器 選擇一款適合自己的編輯器,進行安裝。
Visual Studio Code 官網
Visual Studio 2019 官網
Pycharm 官網
Notepad++ 官網
HackMD 線上編輯器 官網
開始 Github repo 設定 & Hexo 搭建 至 https://github.com/ 申請一個帳號。
設置 Github 專案,建立部落格,會有兩種方式 :
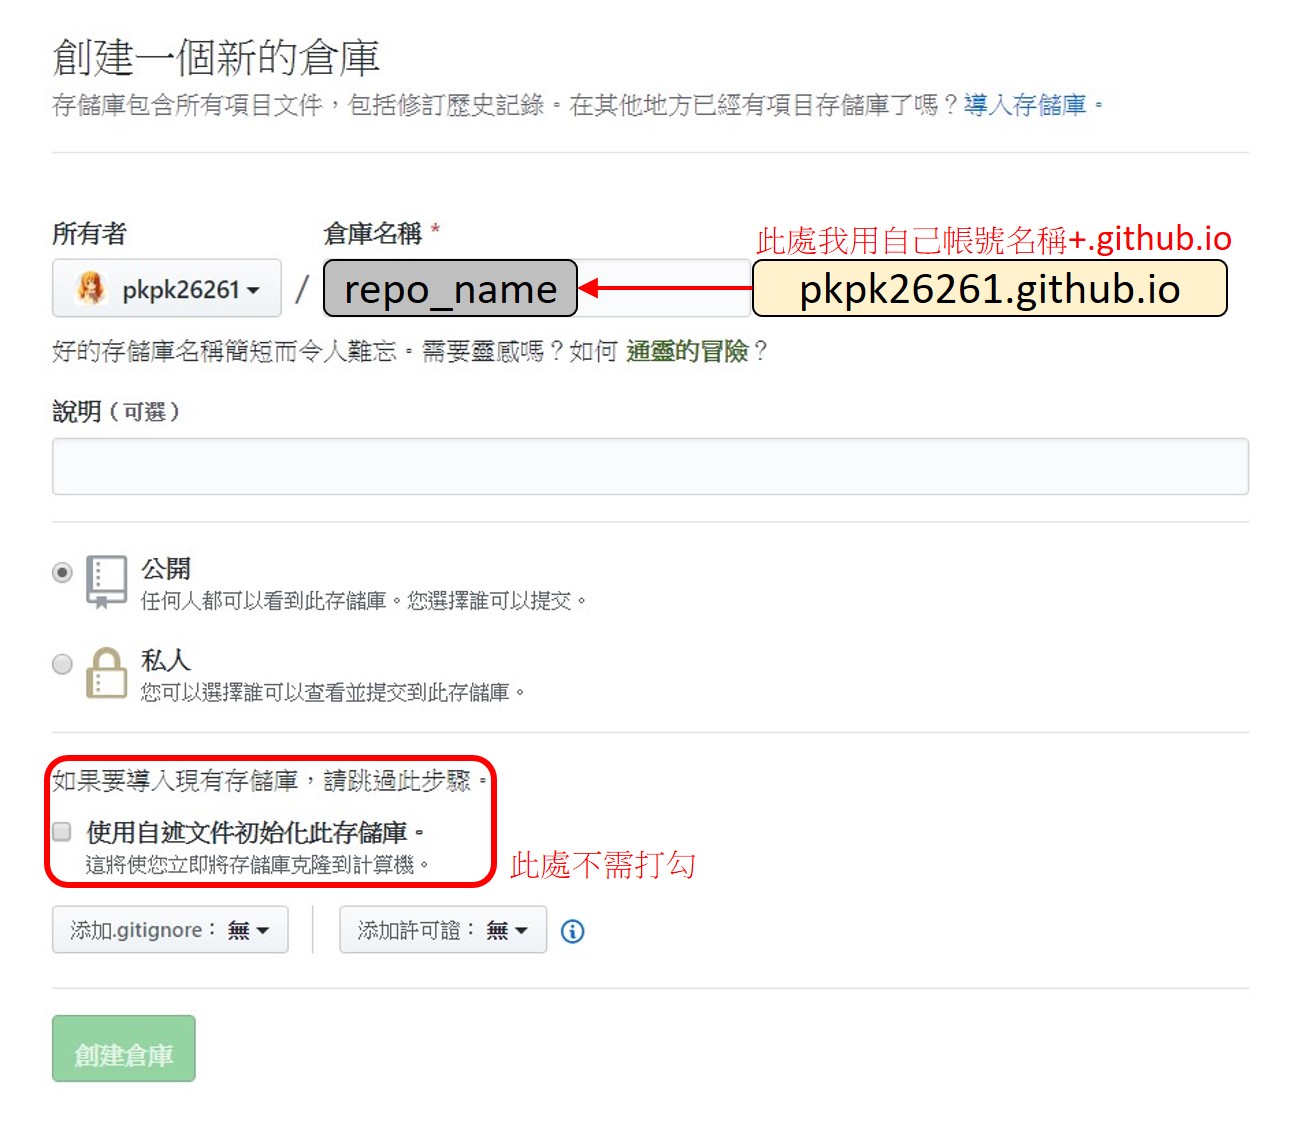
以<個人帳號>.github.io為專案名稱,使用 master branch 建構,https://<個人帳號>.github.io。
以自訂專案名稱 <倉庫名稱> ,使用 gh-pages banch 建構,https://<個人帳號>.github.io/<倉庫名稱>。
我個人做的是想把網址簡單化,因此想保留 https://<個人帳號>.github.io 作為首頁網址,
步驟 1:新增一個 Github New repository 在個人的 Github 頁面上新增一個 New repository 。
步驟 2 : 安裝 Node.js 套件管理工具
安裝Git,至Git官網 下載,安裝即可。
我們可以從Node.js 官網下載安裝,安裝完後至終端機輸入
輸出版本後,便表示安裝已完成。STEP 3 使用沒問題,可以不用重新開機。
步驟 3 : 安裝 Hexo 先打開cmd終端機 ,cd 到你想要安裝目錄,我個人是選擇在隨身硬碟的F:槽裡安裝,方便之後換電腦維護編輯部落格。Hexo和Git、Hode.js安裝完成,也就是步驟 2和步驟 3的步驟要做完。 安裝Hexo
1
2
3
4
5
6
7
8
9
10
11
npm install hexo-cli -g hexo init <name> // name為自定義名稱 cd <name> // name為自定義名稱 (必須與上者name相同名稱) npm install hexo server
hexo server 和 hexo s 是相同意思的,hexo s 後,在網址列輸入http://localhost:4000
接下來有幾個常用到的指令,這些指令將來進行網站修改會常常用到。先不用執行下面步驟,文章後面下面會教到如何使用下方指令。
1
2
3
4
5
6
7
hexo clean //清除舊發布設定 hexo g //建立新發布設定 hexo deploy // deploy 到伺服器 hexo server // 在本地瀏覽網站內容 (預設 http://localhost:4000 )
步驟 4 : 安裝 Next 主題 Next 連結
1
2
3
4
5
cd <name> // 切換到 <name>目錄 (必須與第三步驟的name相同名稱) git clone https://github.com/theme-next/hexo-theme-next.git themes/next // clone Next 主題專案到站點裡的themes資料夾中,並把主題專案改成名稱next。
【注意】在開始調整下方設定和配置之前,必須先了解這個步驟 由於開始設定網頁,會有做出一些變更代碼的事情!
在這邊我建議大家可以開一個新的cmd終端機,cd進入到之前安裝hexo的目錄裡,hexo s 或 hexo server 執行,在瀏覽器輸入網址http://localhost:4000,Ctrl+C 退出終端機,就一直讓這個終端機開著在背景運作就好了!!!F5 做重新載入網頁才行。hexo s 或 hexo server 執行,這樣會比較好。
如出現錯誤訊息,解決方式
ERROR Deployer not found: git
1 npm install hexo-deployer-git --save
Error: Cannot find module 'cheerio'
1 npm install cheerio --save
Hexo 的 hexo d 部署登入問題與解決方式 在使用 hexo d 進行 GitHub Pages 部署時,系統會要求輸入 GitHub 的帳號與密碼。
登入流程
終端機會要求輸入:
1 Username for 'https://github.com':
→ 這裡請輸入 GitHub 註冊的信箱(或 GitHub 帳號名稱)。
接著會要求:
1 Password for 'https://<你的帳號>@github.com':
→ 這裡請輸入 Personal Access Token (PAT),而不是 GitHub 的密碼。
Personal Access Token 產生方式
基本設定 這部分要先教大家如何做一些網站的基本設置,主要的設定檔有兩個\_config.yml\themes\next\_config.yml
\ _config.yml 1 2 3 4 5 6 7 8 title: 永成的學習部落格 subtitle: 這是永成的學習路程之紀錄。 description: 這是永成的學習路程之紀錄。 keywords: author: 黃永成 language: zh-TW timezone: Asia/Taipei
設定網址 1 2 3 4 5 6 7 8 url: https://<個人帳號>>>.github.io/ root: / permalink: :year/:month/:day/:title/ permalink_defaults:
將主題改為 next,這裡若沒進行更改,就無法套用next主題。
如果並不是使用 master 來進行網站設置,branch 的部分要改成gh-pages 。hexo d進行配置上傳。
1 2 3 4 5 6 7 deploy: type: git repo: https://github.com/<個人帳號>/<倉庫名稱>.git branch: master
註:回到此網頁文章起始閱讀地方,了解自己是使用哪種方式來建立專案名稱。
\themes\next\ _config.yml 版權頁設定 設定文末 (或 sidebar) 版權宣告的型態,
變更代碼:
1 2 3 4 5 6 7 8 9 10 11 12 creative_commons: license: by-nc-nd sidebar: true post: true language: deed.zh_TW
選擇版型 Next 一共有四種版型可以選擇,可以自行選擇版型,不要用的版型用#註釋掉即可。
菜單區塊設定 變更代碼:
1 2 3 4 5 6 7 8 9 menu: home: / || home about: /about/ || user tags: /tags/ || tags categories: /categories/ || th archives: /archives/ || archive
大頭照設定 url 部分可以放圖片網址,也可以放資料路徑。例如:\source\images\頭像.jpg
1 2 3 4 5 6 7 8 avatar: url: https://i.imgur.com/E7MHGFe.gif rounded: true rotated: true
社交連結 側邊欄的社交連結部分,顯示自己想提供給讀者的社交平台,可以利用這個部分來設定私人的社交平台連結。
|| 後面是圖示的設定,從 Font Awesome 進行選擇圖示,將網站上的圖示名稱加進去即可。
變更代碼:
1 2 3 4 5 6 7 8 9 10 11 12 13 social: LINE: https://line.me/ti/p/XGjZN3WZhs || envelope-square E-Mail: mailto:a0979488285@gmail.com || envelope GitHub: https://github.com/pkpk26261 || github #Weibo: https://weibo.com/yourname || weibo #Google: https://plus.google.com/yourname || google #Twitter: https://twitter.com/yourname || twitter Facebook: https://www.facebook.com/profile.php?id=100002320400912 || facebook #VK Group: https://vk.com/yourname || vk #StackOverflow: https://stackoverflow.com/yourname || stack-overflow YouTube: https://www.youtube.com/channel/UCdCh7GL1WCTsXJ-6PkTBZZw?view_as=subscriber || youtube Instagram: https://www.instagram.com/da712302/?hl=zh-tw || instagram #Skype: skype:yourname?call|chat || skype
開啟瀏覽人次設定 busuanzi_count 在比較新版的 Next 主題都包含在其中了,enable 的設定改為 true 即可。
1 2 3 4 5 6 7 8 busuanzi_count: enable: false total_visitors: true total_visitors_icon: user total_views: true total_views_icon: eye post_views: true post_views_icon: eye
關閉文章下方版本顯示訊息 【由 Hexo & NexT.Gemini 強力驅動】
菜單圖標 & 項目標誌 1 2 3 4 menu_settings: icons: true badges: true
顯示大約閱讀時間 安裝套件:
1 npm install hexo-symbols-count-time
變更代碼:
1 2 3 4 5 6 symbols_count_time: separated_meta: true item_text_post: true item_text_total: true
加載進度條 安裝依賴項:
1 git clone https://github.com/theme-next/theme-next-pace source/lib/pace
打開\themes\next\_config.yml變更代碼為true:theme可設定喜歡的加載樣式
1 2 3 4 5 6 7 8 9 pace: enable: true theme: loading-bar
在按鈕中顯示閱讀百分比 變更代碼:
1 2 3 4 5 6 7 back2top: enable: true sidebar: false //自行選擇是否變更為true scrollpercent: false //變更為true
閱讀進度條 變更代碼:
1 2 3 4 5 6 7 reading_progress: enable: true position: top color: "#37c6c0" height: 3px
開啟網頁右上書籤功能 變更代碼:
1 2 3 4 5 6 7 8 bookmark: enable: true color: "#0ed145" save: auto
文章右上方顯示關注我的Gitgub 變更代碼:
1 2 3 4 5 github_banner: enable: true permalink: https://github.com/pkpk26261 title: Follow me on GitHub
代碼樣式變更、代碼複製開啟 變更代碼:
1 2 3 4 5 6 7 8 9 10 11 12 codeblock: highlight_theme: normal copy_button: enable: true show_result: true style: mac
放大圖片 輸入指令
1 2 cd 到 next 安裝路徑下 git clone https://github.com/theme-next/theme-next-fancybox3 source/lib/fancybox
原圖:
變更代碼:
效果:
裡面還有幾個可以調整的地方,如有需要,將來會在新增介紹。
語言設定 檢查\themes\next\languages目錄下有無zh-TW.yml,———–新版應該就沒有這個問題了———– zh-TW.yml檔案,
1 2 3 4 5 6 7 8 9 10 11 12 13 14 15 16 17 18 19 20 21 22 23 24 25 26 27 28 29 30 31 32 33 34 35 36 37 38 39 40 41 42 43 44 45 46 47 48 49 50 51 52 53 54 55 56 57 58 59 60 61 62 63 64 65 66 67 68 69 70 71 72 73 74 75 76 77 78 79 80 81 82 83 84 85 86 87 88 89 90 91 92 93 94 95 --- title: archive: 歸檔 category: 分類 tag: 標籤 schedule: 時間表 menu: home: 首頁 archives: 歸檔 categories: 分類 tags: 標籤 about: 關於 search: 搜尋 schedule: 時間表 sitemap: 網站地圖 commonweal: 公益 404 sidebar: overview: 本站概要 toc: 文章目錄 post: posted: 發表於 edited: 更新於 created: 創建時間 modified: 修改時間 edit: 編輯 in: 分類於 more: 更多 read_more: 閱讀全文 untitled: 未命名 sticky: 置頂 views: 閱讀次數 related_posts: 相關文章 copy_button: 複製 copy_success: 複製成功 copy_failure: 複製失敗 copyright: author: 作者 link: 文章連結 license_title: 版權聲明 license_content: "本網誌所有文章除特別聲明外,均採用 %s 許可協議。轉載請註明出處!" page: totally: 共有 tags: 標籤 footer: powered: "由 %s 強力驅動" theme: 主題 total_views: 總瀏覽次數 total_visitors: 訪客總數 counter: tag_cloud: zero: 沒有標籤 one: 目前共有 1 個標籤 other: "目前共有 %d 個標籤" categories: zero: 沒有分類 one: 目前共有 1 個分類 other: "目前共有 %d 個分類" archive_posts: zero: 沒有文章。 one: 目前共有 1 篇文章。 other: "目前共有 %d 篇文章。" state: posts: 文章 pages: 頁面 tags: 標籤 categories: 分類 search: placeholder: 搜尋... cheers: um: 嗯.. ok: 還行 nice: 好 good: 很好 great: 非常好 excellent: 太棒了 keep_on: 繼續努力。 symbol: comma: "," period: "。" colon: ":" reward: donate: 捐贈 wechatpay: 微信支付 alipay: 支付寶 bitcoin: 比特幣 accessibility: nav_toggle: 切換導航欄 prev_page: 上一頁 next_page: 下一頁 symbols_count_time: count: 文章字數 count_total: 總字數 time: 所需閱讀時間 time_total: 所需總閱讀時間 time_minutes: 分鐘
Gemini 版型-色彩配置 這個部分此部落格原本有做修改,但我因為有些配置顏色怪怪的,所以我後來跳過這個步驟,直接用默認配色+動態背景,若讀者您也不想設置這個配置,那也可以跳過這個部分,直接進行下一個步驟。
我這裡文章是使用Gemini版型做維護,故以Gemini作為介紹,
背景 顏色變更\themes\next\source\css\_variables\<你選擇的版型>.styl變更
1 2 3 $body-bg-color = #222222 ;
接下來,
文章方塊 顏色變更\themes\next\source\css\_schemes\Gemini\index.styl變更
1 2 3 4 5 6 7 .post-block { background: rgba(255 , 255 , 255 , 0.15 ); border-radius: $border-radius-inner; box-shadow: $box-shadow-inner; padding: $content-desktop-padding; }
菜單區塊 顏色變更\themes\next\source\css\_schemes\Pisces\_layout.styl變更
1 2 3 4 5 6 7 8 9 10 11 12 13 .header-inner { background: rgba(255, 255, 255, 0.15); border-radius: $border-radius-inner; box-shadow: $box-shadow-inner; overflow: hidden; padding: 0; position: absolute; top: 0; width: $sidebar-desktop; +desktop-large() { width: $sidebar-desktop; }
目錄區塊 顏色變更\themes\next\source\css\_schemes\Pisces\_sidebar.styl變更
1 2 3 4 5 6 7 8 9 10 11 .sidebar-inner { background: rgba(255, 255, 255, 0.15); border-radius: $border-radius; box-shadow: $box-shadow; box-sizing: border-box; color: $text-color; width: $sidebar-desktop; if (hexo-config('motion.enable') && hexo-config('motion.transition.sidebar')) { opacity: 0; }
接下來,這個地方最複雜,也需要嘗試很多次才會知道,顏色的區塊定義在哪裡,我在下方代碼區塊有稍微中文註釋,沒標註釋就是我還不知道,雖然不知道你們能不能理解我註釋的意思,但這都需要自己嘗試才會知道。
文字顏色的設定\themes\next\source\css\_variables\base.styl變更
1 2 3 4 5 6 7 8 9 10 11 12 13 14 15 16 17 18 // 顏色 // 用於整個主題的顏色。 // -------------------------------------------------- $whitesmoke = #a15100; // 菜單選擇顏色 $gainsboro = #a15100; // 本站摘要方框顏色 $gray-lighter = #ddd; // 暱稱 顏色 $grey-light = #eee; // 歸檔 虛線 $grey = #ff7700; // 分類 (數量) $grey-dark = #999; $grey-dim = #eee; $black-light = #eeeeee; //文字顏色 $black-dim = #333; $black-deep = #ff7700; // 文章右下角箭頭、本站摘要名稱 $red = #333333; $blue-bright = #87daff; $blue = #0684bd; $blue-deep = rgba(255, 255, 255, 0.2); // 文章圈選字顏色 $orange = #ff8c00; // 菜單目錄字體顏色
標題欄位顏色變更 從\themes\next\source\css\_schemes\<你選擇的版型>\index.styl來做新增,
1 2 3 .site-meta { background: #000000; //我使用黑色為標題欄的背景色 }
設置閱讀全文按鈕顏色 修改themes\next\source\css\_custom\custom.styl文件,添加:
1 2 3 4 5 6 7 8 9 10 11 12 // 修改按键(button)樣式 .btn { color: #49b1f5; background: #fff; border: 2px solid #49b1f5; } // 按键(button)點擊時樣式 .btn:hover { border-color: #49b1f5; color: #fff; background: #49b1f5; }
再來,編輯16進制顏色變更即可。
版面比例 這邊可以調整一下版面區域的比例配置。\themes\next\source\css\_variables\<所選擇的版型>.styl 最後新增加入
1 2 3 $content-desktop = 100% $content-desktop-large = 100% $content-desktop-largest = 85%
比例可以自行調整,自己高興就好,個人我自己沒有新增這個段落。
動態背景 JavaScript 3D library 使用方法如下:
1 2 cd 到 next 安裝路徑下 git clone https://github.com/theme-next/theme-next-three source/lib/three
之後到 next 設定檔 \themes\next\_config.yml 中設置
1 2 3 4 5 6 7 # JavaScript 3D library. # Dependencies: https://github.com/theme-next/theme-next-three three: enable: true three_waves: false canvas_lines: true canvas_sphere: false
canvas-ribbon 使用方法如下:
1 2 cd 到 next 安裝路徑下 git clone https://github.com/theme-next/theme-next-canvas-ribbon source/lib/canvas-ribbon
之後到 next 設定檔 \themes\next\_config.yml 中設置
1 2 3 4 5 6 7 8 # Canvas-ribbon # Dependencies: https://github.com/theme-next/theme-next-canvas-ribbon # 想要查詢更多的信息: https://github.com/zproo/canvas-ribbon canvas_ribbon: enable: true size: 300 # 色帶寬度 alpha: 0.6 # 色帶的透明度 zIndex: -1 # 功能區的顯示級別
canvas-nest 使用方法如下:
1 2 cd 到 next 安裝路徑下 git clone https://github.com/theme-next/theme-next-canvas-nest source/lib/canvas-nest
之後到 next 設定檔 \themes\next\_config.yml 中設置
1 2 3 4 5 6 7 8 9 10 canvas_nest: enable: true onmobile: false color: "185,185,185" opacity: 1 zIndex: -1 count: 100
修改主題頁面布局為圓角 方法一 在/themes/next/source/css/_variables/custom.styl文件中,
1 2 3 4 5 6 7 8 9 10 11 12 13 14 15 // 修改主題頁面布局為圓角 // Variables of Gemini scheme // ================================================= @import "Pisces.styl"; // Settings for some of the most global styles. // -------------------------------------------------- $body-bg-color = #eee // Borders. // -------------------------------------------------- $box-shadow-inner = 0 2px 2px 0 rgba(0,0,0,.12), 0 3px 1px -2px rgba(0,0,0,.06), 0 1px 5px 0 rgba(0,0,0,.12) $box-shadow = 0 2px 2px 0 rgba(0,0,0,.12), 0 3px 1px -2px rgba(0,0,0,.06), 0 1px 5px 0 rgba(0,0,0,.12), 0 -1px .5px 0 rgba(0,0,0,.09) $border-radius-inner = initial $border-radius = initial $border-radius-inner = 15px 15px 15px 15px; $border-radius = 15px;
方法二 在\themes\next\source\css\_variables\Gemini.styl文件中直接添加:
1 2 3 // 修改主題頁面布局為圓角 $border-radius-inner = 15 px 15 px 15 px 15 px; $border-radius = 15 px;
我個人是使用方法二修改。
添加 PDF 插件 安裝套件 1 git clone https://github.com/theme-next/theme-next-pdf source/lib/pdf
修改next/_config.yml中修改修改:true
1 2 3 4 pdf: enable: false //變更為true # Default height height: 500 px
在要加入pdf的文章,添入代碼
1 2 3 4 5 外部連結: { 本地連接: //在`\source`新建pdf資料夾 {
建立專頁 編寫 在生成的md檔文件中\themes\next\_config.yml編輯,新增書本(book)。
1 2 3 4 5 6 7 8 9 10 menu: home: / || home about: /about/ || user tags: /tags/ || tags categories: /categories/ || th archives: /archives/ || archive 書本: /book/ || book
建立文章 使用外部連結:
1 {% pdf http://Your URL.pdf %}
在source\_posts\文件創建一個文章。
1 2 3 4 5 6 7 8 9 10 11 12 13 14 --- title: 測試 date: 2019-10-17 00:00:00 tags: 測試 categories: 測試 --- <center > **測試** </center > <br > {% pdf 路徑.pdf %} </br >
設置點擊頭像返回首頁 打開themes\next\layout\_macro\sidebar.swig文件,
1 2 3 4 5 6 7 8 //添加代码: + <a href="/"> <img class="site-author-image" itemprop="image" src="{{ url_for( theme.avatar | default(theme.images + '/avatar.gif') ) }}" alt="{{ theme.author }}" /> + </a> //这里注意找到中间代码,添加a标签就行了,中间不用修改。
開啟文章搜索功能 終端機輸入:
1 2 cd 到安裝目錄 npm install hexo-generator-searchdb --save
打開\themes\next\_config.yml變更代碼為true:
1 2 3 4 5 6 7 8 9 10 11 12 13 local_search: enable: true trigger: auto top_n_per_article: 1 unescape: true preload: true
變更搜索欄顏色
搜索頁面文字背景底色\themes\next\source\css\_common\components\third-party\search.styl
1 2 3 4 5 6 7 8 9 10 11 12 13 .search-popup { background: #999999 ; border-radius: 5 px; color: $black-dim; display: none; height: 80 left: 50 margin-left: -350 px; padding: 0 ; position: fixed; top: 10 width: 700 px; z-index: $zindex-5 ;
搜索頁面其餘背景顏色
1 2 3 4 5 6 7 8 9 10 11 .search-pop-overlay { background: rgba(0 , 0 , 0 , 0.1 ); display: none; height: 100 left: 0 ; overflow: hidden; position: fixed; top: 0 ; width: 100 z-index: $zindex-4 ; }
插入Youtube影片自動撥放 打開themes/next/layout/_partials/sidebar/site-overview.swig, 找到if theme.social。
1 2 3 4 5 6 7 8 9 10 11 12 13 14 15 16 17 18 19 20 21 22 23 24 25 26 27 {%- if theme.social %} <div class="links-of-author motion-element"> {%- for name, link in theme.social %} <span class="links-of-author-item"> {%- set sidebarURL = link.split('||')[0] | trim %} {%- if theme.social_icons.enable %} {%- set sidebarIcon = '<i class="' + link.split('||')[1] | trim + ' fa-fw"></i>' %} {%- else %} {%- set sidebarIcon = '' %} {%- endif %} {%- if theme.social_icons.enable and theme.social_icons.icons_only %} {%- set sidebarText = '' %} {%- else %} {%- set sidebarText = name %} {%- endif %} {{ next_url(sidebarURL, sidebarIcon + sidebarText, {title: name + ' → ' + sidebarURL}) }} </span> {%- endfor %} </div> <!--添加此行代碼--> <div class="video-container" style="padding-top: 5%;"> <iframe width="214" height="120" src="https://www.youtube.com/embed/1FliVTcX8bQ?rel=0&autoplay=1&loop=1&playlist=1FliVTcX8bQ&showinfo=0" frameborder="0" allow="autoplay; encrypted-media" allowfullscreen></iframe> </div> <!--添加此行代碼-->
點選頭像返回首頁 打開themes/next/layout/_partials/sidebar/site-overview.swig, 找到site-author-image,上下分別添加<a href="/">``</a>即可。
1 2 3 4 5 6 7 8 9 10 11 12 <div class="site-author motion-element" itemprop="author" itemscope itemtype="http://schema.org/Person"> {%- if theme.avatar.url %} <a href="/"> <!--添加此行代碼--> <img class="site-author-image" itemprop="image" alt="{{ author }}" src="{{ url_for(theme.avatar.url) }}"> </a> <!--添加此行代碼--> {%- endif %} <p class="site-author-name" itemprop="name">{{ author }}</p> <div class="site-description" itemprop="description">{{ description }}</div> </div>
文章加密 打開themes\next\layout\_partials\head\head-unique.swig文件,文末插入這個代碼:
1 2 3 4 5 6 7 8 9 10 11 {# 文章密碼設置 #} <script> (function(){ if('{{ page.password }}'){ if (prompt('請輸入密碼') !== '{{ page.password }}'){ alert('密碼不正確!請訪問作者索取'); history.back(); } } })(); </script>
然後打開要加密的文章,文章開頭放入這個:
1 2 3 4 5 6 7 8 9 10 title: // 標題 tags: // 標籤 - Hexo - NexT categories: // 分類 - Hexo author: // 作者 password: 123456 // 設定文章密碼 date: 2019-10-17 00:00:00 // 發布時間 updated: 2019-10-17 00:00:00 // 更新時間
調整和上傳 在每一個設定變更後,我習慣會做以下動作
1 2 hexo server // 在本機瀏覽器查看 //hexo s
先在本機上看看是否有什麼問題,持續進行微調,最後設定都沒有問題後,再進行配置上傳。
1 2 3 4 5 6 hexo clean // 清除舊的發布設定 hexo g // 建立新的發布設定 hexo deploy // 配置到伺服器 //hexo d
若我已經在`_config.yml輸入
1 2 3 4 5 6 # Deployment ## Docs: https://hexo.io/docs/deployment.html deploy: type: git repo: https://github.com/<user_name>/<repo_name>.git branch: master
在執行hexo deploy或hexo d時,卻發生了ERROR Deployer not found: git的錯誤訊息。
1 2 cd 到安裝目錄 npm install hexo-deployer-git --save
編輯新增文章 撰寫文章都集中放在\source目錄下,最常用到的大概就是source\_posts裡的檔案了。“name” .md 檔案,副檔名為.md,也可以參考預設hello-world.md的檔案做參考。
Hexo是使用MarkDown(MD)格式,每篇文章開頭基本上都一樣,---切記一定要加入)
1 2 3 4 5 6 7 8 9 10 11 12 --- title: // 標題 tags: // 標籤 - Hexo - NexT categories: // 分類 - Hexo author: // 作者 password: 123456 // 設定文章密碼 date: 2019-10-17 00:00:00 // 發布時間 updated: 2019-10-17 00:00:00 // 更新時間 ---
文章類型:
post:最常碰到的一般文章。\source\_posts資料夾內建立[檔名].md的檔案。-
page:不會出現在首頁中。\source\下建立檔名資料夾,並在檔名資料夾下新增index.md檔案。
draft:草稿。\source\_drafts底下,檔名為檔名.md。檔名讓文章公開。
MD語法(Markdown) 網路上已經有很多可以參考的資料了,若有需要可以自行去查。markdown風格 markdown文件
內容撰寫小技巧 (學會新技巧後,此部分會不定時更新)
字形樣式 文字字型與顏色:
1 <font face ="標楷體" color ="red" > </font >
我是紅色的標楷體
文字大小 1 <font size ="16px" > </font >
文字大小:16px
文字置中 置中
刪除線 刪除寫法:
刪除線
也可以用以下寫法:
我被刪除了
縮排 有些人在排版上,希望一段文字首行要空兩個全形空白。
半形空白:`` 
添加空白行 相信很多人的文章都需要按很多空白鍵或Enter鍵。&ensp。<br />或<p />添加空白行。
圖片樣式設定 Markdown檔放入圖片語法
範例:
1 
設定首頁文章【繼續閱讀】功能 【繼續閱讀】<!-- more -->(記得more前後都要空一格),首頁的文章,就會只顯示到此行,讀者就要自行點選more才能觀看全文。
使用表格 hexo支援表格的,表格寫法如下:(表格前記得要空一行,這才能形成表格)
1 2 3 4 5 | 標題1 | 標題2 | 標題2 | | :------ | :------: | ------: | | 靠左靠左靠左 | 靠中靠中靠中 | 靠右靠右靠右 | | 靠左靠左靠左 | 靠中靠中靠中 | 靠右靠右靠右 |
呈現結果:
標題1
標題2
標題2
靠左靠左靠左
靠中靠中靠中
靠右靠右靠右
靠左靠左靠左
靠中靠中靠中
靠右靠右靠右
常用的文字編輯 一定要記:
1 2 3 4 5 6 7 8 9 10 11 12 13 14 15 16 17 18 19 20 21 22 23 24 # 標題一 ## 標題二 ### 標題三 #### 標題四 ##### 標題五 **這是加粗** *這是斜線* ~~這是刪除線~~ `內嵌代碼` >引用 * 無序號列表 * 無序號列表 1. 有序號列表1 2. 有序號列表2 ```代碼區塊``` (兩個 [```] 記得分段成上下,中間編輯你要放的代碼區塊)
以上文章編輯教到這邊,若還有新的編輯方式,我會再另外添加補充。
參考文章 名稱 Theme NexT:Next官方部落格 使用 Github page 製作個人網站 – 以 Hexo / Next 製作部落格 hexo d命令报错 ERROR Deployer not found: git hexo-下一頁主題添加搜索功能